How To Use RemoteIoT Behind Firewall Using Mac: A Comprehensive Guide
So, you’ve landed on this page because you want to know how to use RemoteIoT behind a firewall using a Mac, right? Well, you’re in the right place. If you’re trying to access RemoteIoT while dealing with pesky firewalls, we’ve got your back. Whether you’re working remotely, running a project, or just experimenting with IoT devices, this guide will walk you through everything you need to know.
Imagine this: you’re sitting in your cozy home office, ready to connect to your RemoteIoT network, but BAM—your corporate firewall blocks the connection. Frustrating, right? Don’t worry, because we’ll teach you how to bypass those restrictions and get your IoT devices up and running in no time.
By the end of this article, you’ll not only understand the technical details but also learn some tricks of the trade. We’ll cover everything from setting up port forwarding to using secure tunnels, all tailored for macOS users. Let’s dive in!
Read also:Is Megan Moroney A Liberal Exploring Her Political Identity
This article is packed with actionable tips, step-by-step instructions, and even some cool hacks to make your life easier. Whether you’re a seasoned IT pro or a curious beginner, we’ve got something for everyone. Ready? Let’s go!
Understanding Firewalls and RemoteIoT
Before we dive into the nitty-gritty of using RemoteIoT behind a firewall on a Mac, let’s take a moment to understand what we’re dealing with. A firewall is like a bouncer at a club—it decides who gets in and who doesn’t. It’s designed to protect your network from unauthorized access, but sometimes it can be a bit overzealous.
On the other hand, RemoteIoT is a powerful platform that allows you to manage and monitor IoT devices from anywhere in the world. It’s perfect for businesses, hobbyists, and anyone who wants to keep an eye on their smart devices. However, when you try to access RemoteIoT from behind a firewall, things can get tricky.
Why Firewalls Block RemoteIoT Connections
Firewalls block RemoteIoT connections for several reasons. First, they might not recognize the protocols used by RemoteIoT. Second, they could be configured to block outgoing traffic to certain ports or IP addresses. Lastly, some firewalls have strict rules that prevent any unauthorized access to external networks.
Here’s a quick list of common reasons why firewalls block RemoteIoT:
- Unrecognized protocols
- Blocked ports
- Strict security policies
- Outdated firewall rules
Now that you know why firewalls can be a pain, let’s move on to the solutions.
Read also:What Is The Gerber Life College Plan And How Can It Help You Save For Education
Setting Up Port Forwarding for RemoteIoT
One of the simplest ways to use RemoteIoT behind a firewall is by setting up port forwarding. This involves configuring your router to allow specific traffic through the firewall. Think of it like giving the bouncer a VIP pass for your IoT devices.
Here’s how you can set up port forwarding on a Mac:
- Log in to your router’s admin interface
- Find the port forwarding section
- Enter the necessary ports for RemoteIoT
- Save the settings and restart your router
Remember, the exact steps may vary depending on your router model, so be sure to check the manual or online documentation.
Tips for Successful Port Forwarding
While setting up port forwarding is relatively straightforward, there are a few tips to keep in mind:
- Use static IP addresses for your devices
- Test the connection after setting up
- Document the ports you’ve opened for future reference
By following these tips, you’ll ensure a smooth and secure connection to your RemoteIoT network.
Using SSH Tunnels to Access RemoteIoT
If port forwarding isn’t an option, you can use SSH tunnels to securely access RemoteIoT behind a firewall. SSH tunnels encrypt your traffic, making it nearly impossible for firewalls to block or intercept.
Here’s how you can set up an SSH tunnel on a Mac:
- Open Terminal on your Mac
- Type the following command: ssh -L [local port]:[remote server]:[remote port] [username]@[remote server]
- Enter your SSH credentials when prompted
- Connect to RemoteIoT through the local port
For example, if you’re connecting to a RemoteIoT server at port 8080, your command might look like this:
ssh -L 8080:remoteiotserver.com:8080 user@remoteiotserver.com
Advantages of SSH Tunnels
SSH tunnels offer several advantages over traditional port forwarding:
- Encrypted traffic for added security
- No need to modify firewall settings
- Works with most network configurations
However, keep in mind that SSH tunnels can be slower than direct connections, so use them only when necessary.
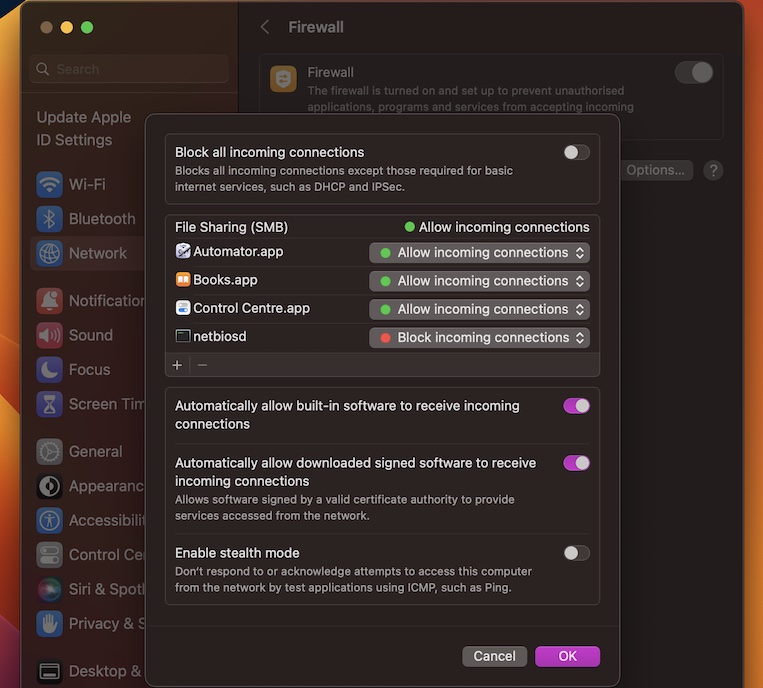
Configuring macOS Firewall Settings
Sometimes, the problem isn’t with your external firewall but with your Mac’s built-in firewall. By default, macOS comes with a firewall that can block certain applications and services. To use RemoteIoT behind a firewall, you may need to adjust these settings.
Here’s how you can configure macOS firewall settings:
- Go to System Preferences > Security & Privacy > Firewall
- Click the lock icon and enter your admin password
- Turn on the firewall if it’s not already enabled
- Add RemoteIoT to the list of allowed applications
By allowing RemoteIoT through your Mac’s firewall, you’ll ensure a seamless connection without any interruptions.
Troubleshooting macOS Firewall Issues
If you’re still having trouble connecting to RemoteIoT after adjusting the firewall settings, here are a few troubleshooting tips:
- Check if the firewall is blocking other applications
- Try temporarily disabling the firewall to test the connection
- Restart your Mac and reapply the settings
These steps should help you identify and resolve any firewall-related issues.
Using a Proxy Server for RemoteIoT
Another way to access RemoteIoT behind a firewall is by using a proxy server. A proxy server acts as an intermediary between your Mac and the RemoteIoT server, bypassing any firewall restrictions.
Here’s how you can set up a proxy server on a Mac:
- Go to System Preferences > Network
- Select your active network connection
- Click Advanced > Proxies
- Enter the proxy server details provided by your network admin
Once you’ve set up the proxy server, try accessing RemoteIoT again. If everything is configured correctly, you should be able to connect without any issues.
Choosing the Right Proxy Server
When selecting a proxy server, consider the following factors:
- Speed and reliability
- Security features
- Compatibility with macOS
By choosing the right proxy server, you’ll ensure a fast and secure connection to your RemoteIoT network.
Implementing VLANs for Secure IoT Access
If you’re dealing with a corporate firewall, you might need to implement VLANs (Virtual Local Area Networks) to securely access RemoteIoT. VLANs allow you to segment your network, keeping IoT traffic separate from other data.
Here’s how you can implement VLANs on a Mac:
- Log in to your network switch or router
- Create a new VLAN for IoT devices
- Assign the RemoteIoT server to the new VLAN
- Configure your Mac to connect to the VLAN
By using VLANs, you’ll not only bypass firewall restrictions but also improve the security of your IoT network.
Benefits of Using VLANs
Implementing VLANs offers several benefits:
- Improved network security
- Reduced bandwidth usage
- Easier management of IoT devices
These advantages make VLANs an excellent choice for businesses and organizations with complex network setups.
Updating Firewall Rules for RemoteIoT
In some cases, the simplest solution is to update your firewall rules to allow RemoteIoT traffic. This involves working with your network administrator to modify the firewall settings.
Here’s what you need to do:
- Contact your network admin
- Provide the necessary ports and IP addresses for RemoteIoT
- Request them to update the firewall rules
- Test the connection once the changes are made
While this approach requires some cooperation with your IT team, it’s often the most effective way to ensure a stable connection to RemoteIoT.
Best Practices for Updating Firewall Rules
When updating firewall rules, follow these best practices:
- Document all changes for future reference
- Test the connection thoroughly
- Monitor the firewall logs for any unusual activity
By following these practices, you’ll minimize the risk of security breaches and ensure a smooth transition to RemoteIoT.
Kesimpulan
And there you have it—a comprehensive guide on how to use RemoteIoT behind a firewall using a Mac. From setting up port forwarding to implementing VLANs, we’ve covered everything you need to know to bypass those pesky firewalls and get your IoT devices up and running.
Remember, the key to success is understanding your network environment and choosing the right solution for your specific needs. Whether you opt for SSH tunnels, proxy servers, or updated firewall rules, the goal is to maintain a secure and reliable connection to your RemoteIoT network.
Now it’s your turn to take action! Try out the methods we’ve discussed and see which one works best for you. And don’t forget to share your experience in the comments below. We’d love to hear how you’ve successfully used RemoteIoT behind a firewall.
Until next time, stay connected and keep those IoT devices humming!
Daftar Isi
- Understanding Firewalls and RemoteIoT
- Setting Up Port Forwarding for RemoteIoT
- Using SSH Tunnels to Access RemoteIoT
- Configuring macOS Firewall Settings
- Using a Proxy Server for RemoteIoT
- Implementing VLANs for Secure IoT Access
- Updating Firewall Rules for RemoteIoT
![Mac Firewall Setting How To Configure It? [Stepwise Tutorial]](https://techyhost.com/wp-content/uploads/2022/12/changing-firewall-settings-mac-1.jpg)
